
Making a personalized snow globe with your little ones as a cozy winter project is perfect for the holidays, or just about any time of the year! Learn how to Make Dazzling DIY Snow Globes!
A few years ago my girls and I decided to try our hand at making our own snow-globes. We had never done it before, but it didn’t seem too complicated… just a little legwork to get some of the supplies ahead of time. Not only did the first globes we made turn out amazing, but my girls absolutely loved the fact that they could be customized for gift-giving to friends and family. They would just keep making them over and over if I let them!
Every year since we have made some to give away as presents. This is such a creative, fun and easy activity to do together! My girls always look forward to it and love brainstorming ideas. You just need to try it! It’s a lot easier than you may think!
This post contains affiliate links, which means I make a small commission at no extra cost to you. See my full disclosure here.
Snow Many Possibilities!
Snow globes are a thoughtful and perfect DIY Christmas present for kids to make and give. Sparkling and mesmerizing for people of all ages! For Christmas one year, my girls made my husband one with a mini barn resembling his barn with pearly white glitter to look like snow falling around it. It came out really beautiful! They also made their grandfather a snow globe with a fairy because he really likes fairies….?!! A bit strange, but ok. He loved it!
Pick A Dazzling DIY Snow Globe Theme
You can pick out something to put in the globe that celebrates your or another’s interests or hobbies – sports, instruments, animals, geographical location, favorite miniature artwork… the possibilities are truly endless!
However, you don’t need to purchase a figurine. Chances are, if you’ve got kids, then you’ve got plenty of tiny plastic toys lying around your house…Am I right?! A little lego, dragon or dinosaur figurine would be cute for a boy, or a little My Little Pony or Hatchimal, or a little woodland creature could be cute for a girl. Simply customize the color and size of the glitter to match your snow globe’s theme!
Our DIY Mermaid & Bunny Rabbit Snow Globes
The very first thing we did was to take a trip to our local craft store where they have a wide selection of plastic and ceramic figurines and I let my girls pick out what they wanted for their globes. They were so excited! My oldest chose a mermaid, and picked out blue glitter so it would resemble the ocean. My youngest chose cute rabbits and shades of green glitter to look like falling forest leaves!
What supplies do you need to make a snow globe?
Below you will find a list of what you need for making a snow globe. There are only a few special things that you will need. Some of the items you may already have in your house! You may use a mason jar, but plastic snow globes are certainly more kid-friendly!
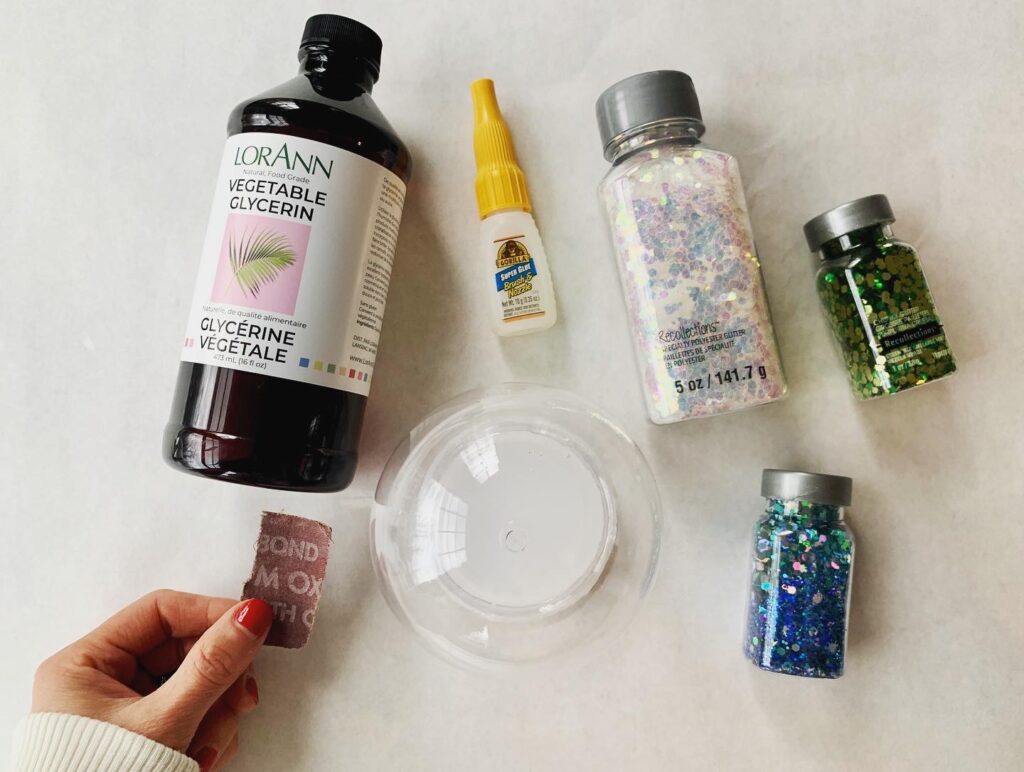
Gather up these materials:
Distilled Water
Plastic Snow globe or Mason Jar
Thicker-style Glitter
Plastic figurine or small waterproof toy
Why use distilled water over regular tap water for making snow globes?
Because distilled water is more pure, you won’t get a cloudy-looking snow globe. Believe me – there is a big difference. We made that mistake with one of our first snow globes and ended up redoing it! You can also try to use bottled water if you can’t find distilled. That should work a little bit better.
Must you use glycerin for making a snow globe?
It’s not completely necessary but will make your snow globes much more legit! They will look a lot more professional. The amount of glycerin that you use will determine the thickness of the liquid in your slow globe – thus creating that “slow-motion” snow falling effect. Always start with at least 1/2 teaspoon for your snow globe. You can add more to achieve your desired result. Be careful to not use too much though because it could make your “snow” clump together!
How to Make Your Own Personalized Snow Globe
STEP 1: Sandpaper
You don’t want to skip this step because it ensures that your little toy or figurine will stand the test of time and not break off, floating around in your globe. Start off by using the sandpaper to buff the underside of your object. Do this as best you can. You will also want to buff the base/lid of your snow globe. This is the part that will be eventually immersed in the liquid and the surface you will be gluing your figurine to.
STEP 2: Glue Your Object
Start off by gluing your figurine to the base provided with your snow globe container. Some people say that you can use a hot glue gun for this but I preferred using super glue to make sure these things would really stay put! Make sure you secure the item well and that the glue is completely dry! I recommend letting them sit for a few hours, or better yet, overnight!
STEP 3: Fill With Distilled Water
Fill up your globe almost all the way to the top with your distilled water and leave just a little bit of room at the top so you can screw on the base.
STEP 4: Add Glycerin and Glitter
The most fun part! Add in 1/2 teaspoon of vegetable glycerin (to start) and if you’d like you can build the amount from there. Just don’t use too much as mentioned earlier because it could cause the glitter to clump. Next, add the glitter of your choice.
STEP 5: Glue Base
Glue on the base. To make sure that the globe wouldn’t leak or accidentally come apart I put a thin later of super glue around the edges of the base before popping them in. Let dry for a few minutes.
STEP 6: Get Shaking!
If you’ve done it right, your homemade snow globe should last for years to come! Ours have, and recently our one-year old is obsessed. I think we may just need to make him his own personalized one this Christmas!
I hope this has inspired you to make your own Dazzling DIY snow globe! Please comment and let me know if you do! I’d love to see how they turned out! As always, you can find more fun projects here.
Leave a Reply